Saturday, October 31, 2009

Happy Halloween Megapost

Happy Halloween Everyone!!!
I guess I'm still a slacker, since it is Halloween evening and I still didn't post all my Halloween stuff for this year. If you are looking for a VERY last minute Halloween idea, here goes:
The colors for all three projects are Pumpkin Pie, Basic Black, Whisper White, and Old Olive.

Don't eat too much candy!

Monday, October 12, 2009

Halloween 2-4-6-8 Treat Box

This is a favorite little treat/gift container of mine. It is so simple and quick to make, and doesn't require any special tools. You can make a short container like this one with a 1/2 sheet of card stock, or make a tall skinny one if you use a whole sheet. Here are the directions:

Start with an 8 1/2" x 11" sheet of cardstock. Cut it in half to 8 1/2" x 5 1/2" for a short container as shown above, or use the whole sheet for a tall one. Measuring along the 8 1/2" side, score the card stock all the way across at 2", 4", 6", and 8". This should leave you with a 1/2" piece at the one edge, which is your "tab" to apply adhesive on later. Then, turn your card stock 90 degrees and score one line 2" from the edge. Then using scissors, snip the first four score lines from the edge of the paper to the intersecting score line. These are now your flaps for the bottom of the box. Use the scissors to cut off the 1/2" x 2" piece, which is the only waste. Stamp your box as desired and then assemble with a strong adhesive along the 1/2" tab. (I like to use Sticky Strip here.) Fold the bottom flaps in and adhere. Then pinch two sides in and squeeze together. Use a hole punch to punch two holes and run ribbon through to tie the box closed. That's it!

For this Halloween box, I used Basic Black card stock and embossed the Batty wheel with Versamark and clear powder. The tag is from the Eat, Drink, and Be Scary set and was inked with Black, Pumpkin Pie, and Green Galore markers and layered on a Green Galore tag.

Happy Treating!
Brycia

Tuesday, September 29, 2009

Fright Night Page

Wow, has it really been this long! Yikes! I'm sorry!

Well, here is something appropriate for the season... made after Halloween LAST year, but still all current stuff amazingly!

Sets used are: Eat, Drink & Be Scary and the Taffy alphabet. The colors are Lovely Lilac, Old Olive, Pumpkin Pie (DSP paper, card stock and ink), and Basic Black. Journaling was done on strips of card stock on the computer.

Happy Fall!
Brycia

Thursday, May 28, 2009

We're Too Young

I love this saying from this set!!! I truly believe so much of age is a state of mind. I certainly don't think I'm old enough to be... well, never mind...

This card was one I offered my stamp club last month. I used the Golden Oldies set and the large grommets from the Mini Catalog and the Rockabilly DSP from the main catalog. The card base is Kiwi Kiss. The image and verse are stamped on Whisper White. The verse was punched out with the large oval punch and also a few small circles were punched to create the conversation bubble. The image was colored with red and grey inks using the blender pens.

Happy Stamping!
Brycia

Saturday, May 16, 2009

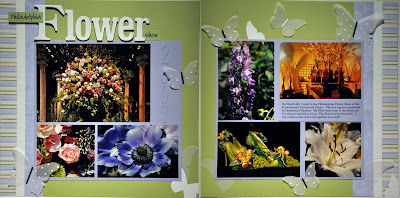
Philadelphia Flower Show Pages

I went to the Philadelphia Flower Show for my first time this year, so I wanted to make a record of my experience. The flowers were gorgeous and it made for great photos. I hope get to go again sometime.

I used Certainly Celery for the base of these pages and the Tea Party DSP on the two edges. I thought there were enough flowers already, so I used butterflies cut with the Stampin' Up! exclusive Beautiful Butterflies Sizzix die. Originally I planned to cut the butterflies from the DSP also, but it was a bit to busy for my taste, so I opted for vellum stamped with Polka-Dots, plain vellum, and Whisper White butterflies.

Saturday, April 4, 2009

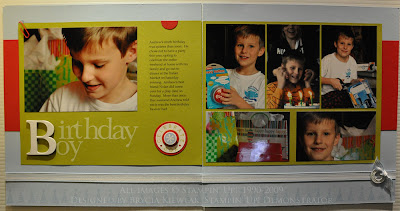
Birthday Boy Scrapbook Spread


My scrapbook club will be doing this spread this Sunday evening. I conveniently scheduled a birthday theme the month after my son's birthday. :)


I used Bashful Blue as the base for these 12x12 pages. I stamped the party hats from Party Hearty along the bottom in Versamark. Then I stamped the title on an 8.5" x 11" sheet in Whisper White Craft Ink (all except the first letter of course) using the Schoolbook Serif Alphabet. After I got the title on, I ran the sheet through my printer to add the journaling. I stamped the "Celebrate You" from Party Hearty in Kiwi Kiss in and punched it out with the 1 3/4" Circle Punch. I layered that to a Real Red circle cut with the Sizzix circle die and stamped the image again in Bashful Blue and layered that to a Real Red circle too. I layered a piece of 5 1/2" wide Real Red on each outer edge and then layered the Kiwi Kiss over top. Finally I added a "B" cut from chipboard covered with Whisper White using the Serif Essentials dies and added some 1/2" striped Grosgrain and a Jumbo Groment along the bottom edge.

Tuesday, March 24, 2009

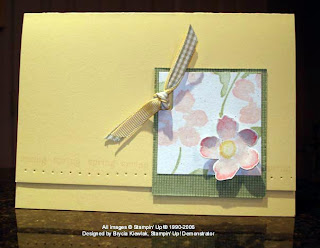
Cherry Blossom Card


I can't believe I made this card three years ago and never posted it! Since the cherry blossoms are nearly out in the D.C. area, I figure now is as good a time as any.


I used So Saffron as the base, with a layer of Mellow Moss, and Naturals White for the image. The flower from Heartfelt Thanks was inked in Blush Blossom and then the edges were rolled in Cameo Coral stamped and cut out. So Saffron ink was used for the center of the main flower. The background flowers were inked in Blush Blossom and "stamped off" once before stamping on the Naturals White layer. The stems were inked with Mellow Moss and stamped off as well. The layer of Mellow Moss cardstock was stamped with Mellow Moss ink using the now retired Canvas background stamp, but any textural stamp would work just fine.


About a 1/2 inch was cut from the bottom front of the card and then the edge was paper pierced and stamped with "spring" from the now retired Everyday Flexible Phrases in So Saffron. Grosgrain and Gingham ribbon were attached through a hole punched with the slot punch to finish it off.


Happy Stamping!
Brycia

Wednesday, March 11, 2009

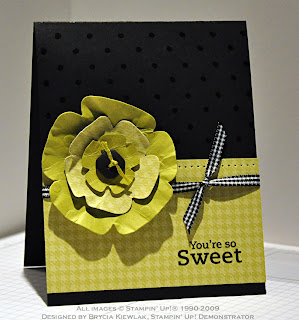
Funky Flower Card


I'm still hooked on that Urban Oasis DSP and still into the funky and fun look. This is the card that my stamping club did last night for their project. It was pretty quick and everyone's looked great when they were done.


I used Basic Black card stock as the base and stamped the Polka Dot background on the top half with Versamark and embossed with clear powder. In case you are looking for this versatile background stamp in the current catalog, you won't find it. It is on the dormant list, meaning it is still available but not shown in the catalog. The item number is 109276 and it's $17.95.


Anyway... after that I put the verse on the Kiwi Kiss patterned paper... this photo actually shows the card done with a rub-on from the "A Perfect Day" rub-on set. Last night I had everyone stamp "It's your day... ENJOY" from the On Your Birthday set since I didn't have enough rub-ons to go around. After attaching that 2 1/4" piece to the card, I pierced along the top edge and tied the black gingham ribbon around the card. I cut the flower using the Sizzix die "Flower Layers" (113458 - $15.95, page 199 of the catalog). I used the three biggest layers and cut the largest from Kiwi Kiss card stock, the middle from the Kiwi Kiss DSP, and the smallest from the card stock. Then the important part... scrunch them all up and then flatten them out to give them texture. Layer the three layers, attach a black button with a glue dot, and thread some green floss through to dress the button up. That's it!


Happy Stamping!

Brycia

Monday, March 9, 2009

Urban Chic White Rose


I have really been enjoying working with the Urban Oasis Designer Series Paper and the Fifth Avenue Floral set is the perfect companion for creations with a contemporary flair. This is a super simple card that you can create in no time.


First emboss the rose from Fifth Avenue Floral using Basic Black Craft Ink and clear embossing powder and cut it out. Then emboss the verse on a 3.25" x 4.25" piece of the floral DSP using the same method and attach it to the right side of the card. Emboss the large dots on a 2.25" x 4.25" piece of Whisper White with the Stampin' Up! Texturz plate and attach to the left side of the card. Attach a 1/2" wide strip of Kiwi Kiss DSP as shown and mount the rose over top using dimensionals. All done!


Happy Stamping!

Brycia

Tuesday, February 24, 2009

Inspired by Nature Sideways

If any of you were to my Stampin' Up! Demonstrator website a few months ago, you already saw the card in the front. Well, I liked it so much I decided to see what it looked like turned on its' side. I like the landscape version that Stampin' Up! designed more, but it was fun to try!

Both cards are done with Kiwi Kiss Textured Card Stock. Urban Garden Designer Series Paper was embossed with white embossing powder using the Inspired by Nature flower. A torn strip of Pacific Point with a tiny strip of Baja Breeze was layered on top of the background paper. The verse was stamped in Pacific Point on a small piece of Whisper White, the two right corners were rounded, then a piece of 5/8" grosgrain ribbon was attached to the left side of the verse with a Filigree brad.

Happy Stamping!
Brycia

Sunday, February 22, 2009

Blue-Eyed Blonde Spread


This was a really fun page to make, with all the funky color and lots of texture. I love these fun photos of my daughter so much, I had to try to make a page as fun to go with them!


I used Basic Black for the base and then layered a 3 1/4" by 11" piece of Kraft along the bottom. I pierced the top and bottom edges of the Kraft. Then I layered circles cut with the Sizzix Circles #2 and Clear Circle out of Kiwi Kiss, Baja Breeze and Urban Oasis Designer Series Papers. The circles cut from card stock I then texturized with the Stampin' Up! Textuz Plates for the Big Shot. I cut the title with the Go Go Boots Alphabet using Black card stock, added a black embossed "December" from the Full Calendar set and '08 with the Go Go Boots Alphabet. I added three pieces from the SoHo Hardware to finish it.


Oh, the journaling I did on the computer and ran the Kraft card stock through. That is my favorite way to journal - ya got a spell checker, ya can reformat, and no screw-ups! Sorry to the Purists who like the handwritting sample... it's just not for me whenever I can avoid it!
BTW, this is the spread my new scrapbook club will be doing tonight. I have a second session Monday morning at 10AM and have room for guests then. If you are interested, please email me at 1morestamp@gmail.com for more information.
Happy Scrapping!
Brycia

Tuesday, February 17, 2009

Riordan's Baby Card

Here's a baby card I made a few months ago and didn't post... didn't want it on the blog before the receipent got it... but he's probably crawling and talking by now! LOL!

I wanted to personalize the card, and was going to put his name "Riordan" on the card, but only had the Serif Essentials dies at the time. I ended up using only his initials and still had to make it a long card. I used the stars and verse from Nursery Necessities. Stars are stamped on So Saffron with So Saffron ink. The verse is embossed with white on the Bashful Blue background paper. The dry embossing is the Cuttlebug Swiss Dots embossing folder on Whisper White card stock, run through my Big Shot. Single star is a Stampin' Up! chipboard star covered in So Saffron. Some paper piercing and blue gingham ribbon finish it off.

Happy Stamping!
Brycia

Friday, February 13, 2009

A Happy Heart with Barely Banana

Okay, last of the last minute Valentine's! This one uses A Happy Heart also, can you tell that is my only Valentine's set right now???

I wanted to try out my Stampin' Up! exclusive Texturz Plates, so this is the first of my finished products. I used the large Polka-dots with Barely Banana card stock, and smooshed dots on the right 3/4 of the card. Then I layered textured Bashful Blue card stock and a small strip of Pixie Pink on top. I stamped both hearts in Pixie Pink on Whisper White card stock and cut/punched them out, and attached both with dimensionals. I added a bit of ribbon and paper piercing to finish it off. That's it! Pretty quick!

A Happy Heart Clear Pillow Box

Sorry, I'm a little late posting this... time just flys by me anymore! Anyway, if you are looking for a last minute Valentine's idea, I'm posting two today...

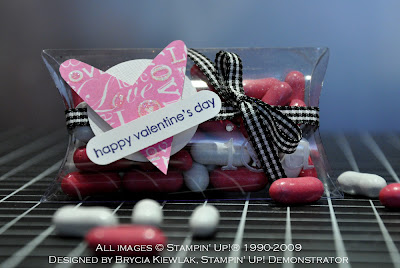
This is the second of the two projects we did in my last stamp club. The pillow box is cut with the Sizzix Bigz die (Stampin' Up! Item #113466) from clear report covers that my buddie Marie gave me. Thanks Marie!!!

I stamped "I ♥ U" with white Staz-on at the lower right-hand corner of the box. Then I punched a 1 3/4" circle from white textured card stock, stamped the heart from A Happy Heart in Pixie Pink on Whisper White, and stamped the "Happy Valentine's Day" from the set in black on Whisper White. I cut the heart out inside the edge to make it a bit smaller, punched the verse with the Word Window punch, and assembled it all with Stampin' Dimensionals. Oh, I forgot... I put a little glitter on a few spots on the heart before assembling - just to give it a little bling! I tied the Black Gingham ribbon around the box and mounted the heart over top with two dimensionals. Oh!!! Don't forget to put the Good 'n Plenties in first!

Happy Valentine's Day!
Brycia

Wednesday, February 4, 2009

A Happy Glittered Heart

This is the first of two projects my stamp club made last night. It's just a simple Valentine that isn't too frilly to give to your guy. And, I promise, this is the last of the Kraft card stock for Valentine's Day this year!

I stamped the Tic-Tac-Toe in Versamark and embossed with black EP on about a 2 3/4" x 2 3/4" square of Kraft. I also covered a small chipboard heart with the two-way glue, including the edges and applied some red ultra-fine glitter to it. I layered the Tic-Tac-Toe to a Basic Black square and attached that to a 4 1/4" square Kraft card. After the glittered Heart dried I attached it as shown with glue dots. A little bit of black gingham through a hole in the lower right-hand corner adds a bit more detail too. Oh my gosh! No dimensionals on this entire card! Wow!

A Valentine Treat container coming next! Don't forget that it is Sell-a-bration, and you can get a free catalog by ordering on-line from my website, too: www.1morestamp.stampinup.net.

Happy Stamping!
Brycia

Saturday, January 31, 2009

A Happy Riding Hood Red Heart

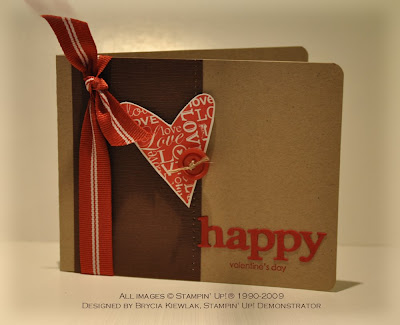
I like the Kraft Valentine idea so much, that I went for another. This one uses Kraft as the base, with a strip of textured Chocolate Chip next. I pierced the right edge of the Chocolate Chip, then affixed "happy" (cut with the Naturally Serif Sizzix die) on with Two-way glue after I stamped "valentine's day" in Riding Hood Red (of course). Then I tied a Riding Hood Red striped ribbon on and attached a heart stamped on Whisper White with Riding Hood Red with Dimensionals. Finally I attached a Riding Hood Red button with glue dots to the heart.

Happy Stamping!
Brycia

Monday, January 26, 2009

Kristina's Little Valentine

Ever feel like your lost your stamping MOJO, baby? I had this weekend when I sat down to stamp a Valentine or two. The best thing to help me get my groove back is to copy someone else's great design, maybe making a small change or two, but basically copying the whole thing. So, I used one great source of inspiration, KWernerDesignBlog (http://www.kwernerdesign.com/blog/) to get my mojo back, hope you don't mind, Kristina!

Like Kristina, I used a little 3"x3" Kraft card for this, along with a bit of Real Red embossed with dots along the bottom. For mine, I used the heart from A Happy Heart, stamped in Real Red and cut out. Instead of pale pink, I used Very Vanilla for the scalloped edge near the bottom, and a Vanilla button. The rest is the same.

Thanks Kristina!

Happy Stamping!
Brycia

Friday, January 23, 2009

Celebrate 8 Card

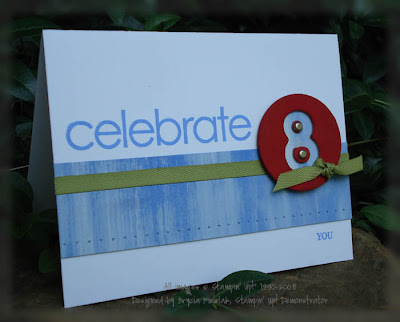
This is a card I did with the leftovers of a scrapbook page I did for my son's last birthday. You can see the pages here: http://1morestamp.blogspot.com/2008/05/celebrate-8.html. It's very simple... I just didn't want to let the left over negative "8" get lost, so I did the card.

I used Bashful Blue card stock and did direct to paper with the white craft ink for the strip of blue. The card is Whisper White with Bashful Blue ink stamped. The "8" is colored with Real Red craft ink and attached with glue dots and silver brads to a circle of the Bashful Blue. I finished it off with now retired Old Olive Twill ribbon.

Happy Stamping!
Brycia

Thursday, January 22, 2009

Enjoy Every Sweet Moment

I'm so glad the Sweet Always DSP made it into the new catalog... I just love it! This card was one I made and then wasn't happy with, so I ripped it apart and re-did it. Okay, I admit, I obsess sometimes... Anyway...

The base card is Chocolate Chip card stock punched with the Scallop Edge Punch. I then punched an additional strip of Chocolate Chip and attached it under the first one and offset it. I pierced all the scallops with the paper piercer too. I stamped some of the flowers from the Enjoy Every Moment set in Chocolate Chip on the upper part of the card, and embossed one flower on Chocolate Chip CS with clear powder and cut out. Then I cut a strip of Sweet Always DSP, stamped "happy" on it in Chocolate Chip and layered that on the card. Finally, I cut a square of Pumpkin Pie, pierced all around that and mounted it over the DSP. I made a Build-a-brad with the DSP and put that in the center of the embossed flower, then mounted that on the Pumpkin Pie with Dimensionals. I thought it still needed something, so I added the 5/8" Chocolate Chip Grosgrain bow - and yes, the holes and bow goes through the front of the card.

Happy Stamping!
Brycia

Tuesday, January 20, 2009

The Spring -Summer Idea Book and Catalog is here!


The Spring-Summer Idea Book and Catalog is here, with lots of new stamps and great accessories! If you haven't gotten your copy yet, you can check it out on my Stampin' Up! website: http://www.1morestamp.stampinup.net

Thursday, January 8, 2009

Don't Forget the Birds!


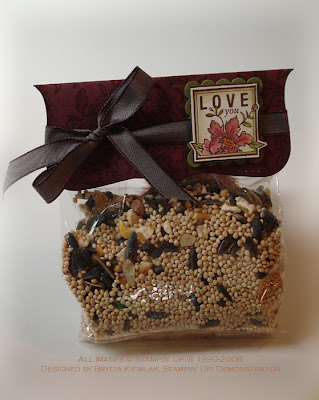
I orginally made this treat for the tweeties as a wedding flavor thing, since I liked this color combo so much - although the colors are not that "wedding looking". I thought I'd post it now, since it is so cold today here in the northeast, to remind everyone to take care of their feathered friends outside.

For this one I cut a Top Note from Bravo Burgundy using the Stampin' Up! Big Shot machine, then stamped it with the Bella Toile background stamp using the Bravo Burgundy ink and then sponged the edges with the burgundy ink. The Dreams Du Jour image was stamped with Timber Brown Staz-On on Very Vanilla card stock and watercolored with the ink pads. I cut the image out and layered it over a scalloped square punched from Old Olive. After filling the cello bag and stapling the Top Note on, I tied a Chocolate Chip Taffeta ribbon around the Top Note at attached the layered image.

Happy Stamping!
Brycia

Sunday, January 4, 2009

Rich Bella Dreams

Bella Toile background and Dreams Du Jour come together with the rich colors of Bravo Burgundy, Old Olive, and Chocolate Chip for this elegant card inspired by a Kristina Werner Color Challenge. I used the Scalloped Edge punch on the edge of the Burgundy, and also on a strip of Old Olive I layered behind the Burgundy - then pierced both layers in the center of each scallop. The focal point was stamped in Staz-On Timber Brown and watercolored from the ink pad lids on Very Vanilla. A ribbon of Chocolate Chip Taffeta adds the finishing touch.

Happy Stamping!
Brycia

Saturday, January 3, 2009

Christmas Photos

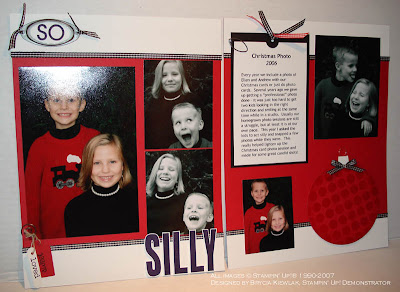
This is a Christmas spread I did two years ago but don't think I ever shared. Forgive me if you've seen this before... but for those who haven't, here it is!

First, as you can see, it's not your traditional "Christmas morning" type page. I don't think I had any scrapbook worthy shots that year. I did have lots of "Christmas card photo" shots though, since I had given up on the formal, serious photo and just told the kids to act silly while I clicked away. That year was one of the most fun Christmas photo sessions and I think this page conveys that.

The page is very simple, but you know I like simple. Whisper White with a swatch of Real Red in the middle, edged with black gingham ribbon. I made a large "ornament" by cutting a circle, using Versamark and clear powder to emboss a texture on it, and sponging the edges. This dotted background is retired, but any background stamp would provide interesting texture. A few accent words and a title stamped in black, and journaling done on the computer, and that's all that is to it!

I hope everyone had a wonderful holiday and has a safe and happy new year!

Happy Stamping!
Brycia